

Self-hosting sounds like a vibe. “Run your own cloud,” the Reddit posts say. “Take back control of your data.” And then you actually try it, and suddenly you’re three hours deep into a router configuration screen, you’ve got five Docker tutorials open in different tabs, and you’re comparing a dozen apps that all promise to be “the Google Drive replacement you’ve been waiting for.”
Here’s something I’ve learned after years of running my own services and helping others get started: beginners don’t fail at self-hosting because they lack technical skills. They fail because the entry point is a pile of choices with no map. Everyone’s happy to tell you what to install, but almost nobody explains how to think about it, or more importantly, what order to learn things in so you don’t accidentally turn a fun weekend project into a permanent on-call obligation.
This article is that map.
I’m going to explain what self-hosting actually is (and what it isn’t), what problems it genuinely solves, the safest way to start, and the early mistakes that cause most of the frustration. By the end, you’ll have a clear path for your first month, a short list of services that are perfect for learning, and a checklist you can use to know when you’re actually ready to add more.
Let’s get into it.
What self-hosting actually means
Self-hosting means running services you rely on, things like file storage, photo backups, notes, media streaming, or monitoring dashboards, on infrastructure you control rather than on someone else’s platform.
That “infrastructure you control” could be an old laptop sitting in a closet, a small mini-PC under your desk, a proper server in your basement, or even a cheap virtual private server (VPS) you rent from a cloud provider. The defining characteristic isn’t where the hardware lives. It’s that you decide how the software runs, where the data lives, and who can access it.
This is different from using a service like Google Drive or Notion or Spotify. With those, you’re renting access to software that runs on their computers, stores data on their systems, and operates under their rules. You get convenience and reliability in exchange for giving up control (and usually paying a subscription, or “paying” with your data and attention).
Self-hosting flips that equation. You get control and flexibility, but you also take on responsibility.
Self-hosting is not “just using Docker”
I see this confusion a lot, and it’s worth clearing up early. Docker is a tool, a very useful one, but running a Docker container on your laptop to test something is not the same as self-hosting.
Self-hosting implies operating a service over time. That means keeping it running, keeping it updated, backing up the data, and having a plan for when things break. You can absolutely use Docker to self-host (most people do these days), but the container technology is just the delivery mechanism. The real work is everything that happens after you type docker compose up.
Think of it this way: installing an app is the easy part. Operating it for six months without losing data or going crazy? That’s the actual skill you’re building.
What people self-host (and why)
Before we get into the how, let’s talk about the what. Here are the most common categories of things people run on their own hardware:
File sync and storage. Services like Nextcloud or Seafile let you sync files across devices the way Dropbox does, but with your own storage. Popular with people who have large file collections or who don’t want their documents living on someone else’s servers.
Photo management. Tools like Immich or PhotoPrism give you a Google Photos-like experience for organizing and browsing your photo library, without the compression, without the AI training on your family pictures, and without the monthly fee.
Notes and wikis. Apps like Obsidian (with sync), Si-Yuan, or Outline let you build a personal knowledge base or note-taking system that you fully own. Particularly popular with people who’ve been burned by a note-taking service shutting down or changing their pricing.
Media streaming. Plex and Jellyfin turn a hard drive full of movies and music into your own personal streaming service, complete with apps for your TV, phone, and browser.
Password management. Vaultwarden (a lightweight Bitwarden-compatible server) lets you run your own password vault. This one comes with serious caveats we’ll discuss later.
Monitoring and dashboards. Tools like Uptime Kuma or Grafana let you keep an eye on your services and infrastructure. These become more useful as your setup grows.
RSS readers, bookmark managers, read-later apps. Smaller utilities that replace services like Feedly, Pocket, or Raindrop with something you control.
The motivations vary. Some people are primarily concerned about privacy. Some want to reduce recurring subscription costs. Some have specific needs that commercial services don’t meet (like storing 10TB of raw photo files without paying Google’s storage prices). And honestly? Some people just enjoy tinkering and building things. All of these are valid reasons.
The real costs: What you gain and what you take on
Let me be honest with you about the tradeoffs, because too many self-hosting guides skip this part and leave people feeling like they failed when things get hard.
What you gain
Control. You decide what software runs, what features are enabled, and what happens to your data. No one can deprecate a feature you rely on or change the terms of service.
Privacy. Your data lives on your hardware. It’s not being mined for advertising, used to train AI models, or shared with third parties. For things like personal photos, notes, or financial documents, this matters to a lot of people.
Portability. Most self-hosted software uses open formats and supports data export. If you decide to switch tools or shut something down, you can actually take your data with you.
Cost predictability. Once you have the hardware, most self-hosted software is free. No more monthly subscription creep across fifteen different services.
Learning. This one’s underrated. Running your own services teaches you an enormous amount about networking, security, system administration, and how software actually works. These skills transfer to professional work if you’re in tech, and they make you generally more capable with computers even if you’re not.
What you take on
Maintenance. Software needs updates. Security patches need to be applied. Things break and need fixing. This isn’t a huge time commitment once you’re set up (maybe a few hours a month for a small setup), but it’s not zero.
Responsibility. If your self-hosted photo library loses data because you didn’t set up backups properly, there’s no support team to call. The data is just gone. This is the flip side of control: the buck stops with you.
Uptime is your problem. Commercial services have teams of engineers keeping things running 24/7. Your home server has… you. And your home internet connection. And that one circuit breaker that trips sometimes.
The learning curve. Getting started requires learning new concepts: containers, networking, storage, security basics. None of it is impossibly hard, but it does take time and effort.
The honest truth is that self-hosting is not the right choice for everything or everyone. If you need 99.99% uptime for something mission-critical, pay for a commercial service. If you don’t enjoy any aspect of technical problem-solving, you might find this more frustrating than fun. And if a service is genuinely best-in-class and the subscription cost doesn’t bother you, there’s nothing wrong with just… using it.
Self-hosting shines when you have specific needs commercial services don’t meet, when privacy genuinely matters for the data in question, when you want to learn, or when you enjoy the process itself. It’s not about ideology. It’s about picking the right tool for what you’re trying to accomplish.
Beginner rules of thumb
Before we get into specific services and the learning path, I want to give you some principles that will save you a lot of pain. These come from watching (and making) a lot of mistakes.
Local first, always
When you deploy a new service, keep it accessible only on your local network first. Don’t punch holes in your firewall. Don’t set up port forwarding. Don’t make it available from the internet.
This gives you time to learn how the service works, configure it properly, and make sure your backups are solid, all without exposing a potentially misconfigured application to the entire internet. You can always add remote access later. You can’t un-leak data.
One service at a time
The temptation to spin up ten containers on day one is real. Resist it. Each service you add is another thing to update, another thing to back up, another thing that might break. Start with one. Get comfortable with the full lifecycle: deployment, configuration, updates, backups, restore testing. Then add the second one.
Restore beats backup
Everyone knows they should have backups. Far fewer people have actually tested restoring from those backups. A backup you’ve never tested is a theoretical backup. You don’t actually know if it works until you’ve proven you can restore from it.
Make “test a restore” part of your initial setup for every service. Spin up a temporary container, point it at your backup data, and verify that everything actually works. Do this once and you’ll sleep much better.
Document as you go
Future you will not remember why you made that configuration choice, what that environment variable does, or where you put the admin password. Keep a simple text file (or a self-hosted wiki, once you’re ready) where you note what you installed, where the data lives, what you changed from the defaults, and why.
This also makes it much easier to rebuild if you need to, or to help yourself six months later when something breaks at 11pm.
Starter Services (Low Regret, High Learning)
Not all self-hosted applications are created equal when it comes to learning. Some are perfect training wheels: easy to run, easy to migrate away from, and not catastrophic if something goes wrong. Others will absolutely ruin your weekend if you make a mistake.
Here are my recommendations for where to start:
1. Linkding (bookmark manager)
This is my top pick for a true beginner’s first service. It’s a simple, fast bookmark manager with tagging, search, and archiving features.
Why it’s great for learning: One container, one small database, predictable behavior. You’ll actually use it daily (which means you learn through repetition), and if something goes wrong, you’ve lost some bookmarks, not your entire digital life. Export and backup are straightforward.
What it teaches: Volumes and data persistence, updates, logs, basic authentication, and the “where is my data actually stored?” question you’ll ask for every service.
2. FreshRSS (RSS reader)
If you still use RSS (and more people are coming back to it as social media continues to fragment), FreshRSS is a solid, mature reader with a clean interface.
Why it’s great for learning: Similar profile to Linkding: clear value, minimal dependencies, small data footprint. RSS subscriptions are easy to export if you want to switch later.
What it teaches: The same fundamentals as Linkding, with slightly more configuration options to explore.
3. Uptime Kuma (monitoring)
Once you have one service running, Uptime Kuma becomes incredibly useful. It’s a lightweight monitoring tool that checks if your services are up and can alert you if something goes down.
Why it’s great for learning: Instant feedback loop. You can see what’s working and what isn’t. It makes the abstract concept of “availability” concrete.
What it teaches: Ports, health checks, notifications, and the fundamental question of “how do I know if this thing is actually working?”
4. Homepage or Dashy (dashboard)
A dashboard gives you a single page that links to all your services. It’s not critical infrastructure, but it makes your setup feel coherent and organized.
Why it’s great for learning: Low risk, but it naturally leads you toward understanding reverse proxies when you’re ready. It’s also satisfying to see your growing collection of services in one place.
What it teaches: Configuration files, organizing your stack, and eventually, how services talk to each other.
5. HedgeDoc (collaborative notes)
A lightweight collaborative markdown editor. Great for documenting your homelab as you build it.
Why it’s great for learning: Simple enough to run, useful enough to actually use, and teaches you about data export and basic access control.
What it teaches: Database persistence, backups of both files and databases, and the importance of having your notes somewhere you can actually get to them.
Services to avoid early (high regret)
Some services are not good choices for beginners, and I want to be explicit about why:
Password managers (like Vaultwarden) are too important. If your password manager goes down or loses data, you’re locked out of your entire digital life. Run this only after you’re confident in your backup and restore procedures.
Email servers are notoriously difficult to run correctly. Deliverability alone is a nightmare. Even experienced sysadmins often recommend against self-hosting email in 2026.
Authentication/SSO platforms become single points of failure for everything else. Not a beginner project.
Full photo libraries require you to get storage planning and backup procedures right before you commit tens of thousands of irreplaceable family photos. Get comfortable with smaller services first.
The pattern here is: avoid anything where data loss would be catastrophic, and avoid anything that becomes a dependency for everything else. Those are “later” projects, not “first month” projects.
The first-month path
Here’s a week-by-week plan that builds skills in the right order. This isn’t the only way to do it, but it’s a path that avoids most of the common traps.
Week 1: Foundation (make it boring)
The goal this week is not to run any services yet. It’s to get your host machine into a solid baseline state.
Pick your hardware. An old PC works fine. A mini-PC like an Intel NUC or one of the many similar options is popular. A Raspberry Pi can work for lighter services, though I’d recommend something with a bit more power if you plan to grow. Even an old laptop with a broken screen works, you just need something that can stay on.
Install your OS. For beginners, I recommend Ubuntu Server LTS or Debian. Both are well-documented and stable. If you’re coming from a NAS like Synology or Unraid, those work too, though the specific commands will differ.
Do the basics (you can find all the necessary help HERE):
- Run your system updates
- Create a non-root admin user
- Set up SSH keys (and disable password authentication for SSH)
- Enable a basic firewall (UFW on Ubuntu is beginner-friendly)
- Make sure you have console access or a recovery path (direct keyboard/monitor, IPMI, or VM console)
Decide on your data layout. Pick a directory structure before you need it. Something like /srv/appname/ for each application, with subdirectories for config and data, works well. Consistency here saves headaches later.
Start your documentation. Create a simple markdown file: what you installed, what you changed, and any passwords or configuration choices you made.
The goal for week one: You can log in safely, update safely, and you know where your data will live. No services yet, just a solid foundation.
Week 2: First service (one only)
Now you deploy your first application. Just one. I recommend Linkding or FreshRSS, but pick whichever of the starter services actually sounds useful to you.
Keep it local-only. Access it via your server’s local IP address on your home network. No port forwarding, no tunnels, no public access. Just http://192.168.x.x:9090 or whatever port your service runs on.
Learn the lifecycle:
- Start the service (
docker compose up -d) - Stop it (
docker compose down) - Restart it
- Check if it’s running (
docker ps) - View the logs (
docker compose logsordocker logs container_name) - Find where the data is actually stored (check your volume mounts)
Update it once. Even if there’s no new version, go through the update process: pull the new image, recreate the container, verify everything still works. You want this to feel routine, not scary.
Document what you did. Add to your notes: what service, what port, where the data lives, any configuration you changed from defaults.
The goal for week two: Confidence with the basic lifecycle of one service. You can start it, stop it, check on it, and find its data without having to look things up every time.
Week 3: Backups and restore (the crucial part everyone skips)
This is the week that separates people who have a hobby from people who have a ticking time bomb. I cannot stress this enough: backups without tested restores are just hope with extra steps. (You can find everything you need to know about creating a robust backup and restore plan HERE.)
Identify what needs backing up:
- The data volume(s) for your service (this is where the actual user data lives)
- Your configuration files (
docker-compose.yml,.env, any app-specific config)
Implement a simple backup routine. This doesn’t need to be fancy. A shell script that runs tar on your data directories with a timestamp is enough to start. Something like:
#!/bin/bash
BACKUP_DIR="/path/to/backups"
APP_DIR="/srv/linkding"
DATE=$(date +%Y%m%d_%H%M%S)

tar -czvf "$BACKUP_DIR/linkding_$DATE.tar.gz" "$APP_DIR"

# Keep only last 7 backups
ls -t "$BACKUP_DIR"/linkding_*.tar.gz | tail -n +8 | xargs -r rm
Run it manually for now. You can automate it with cron later once you’re comfortable.
Test a restore. This is the critical part. Extract your backup to a temporary directory. Spin up a new instance of the service pointing at that extracted data. Log in. Verify your data is there. Then delete the temporary instance.
You haven’t completed week three until you’ve done this. I mean it.
The goal for week three: You’ve proven you can recover, not just “made backups.” You know exactly what files you need to rebuild your service from scratch.
Week 4: Controlled remote access
At this point, you might want to access your service from outside your home. Maybe from your phone when you’re out, or from work. The key is doing this without exposing your service to the entire internet.
Set up private remote access. The current best options for beginners in early 2026 are mesh VPN solutions like NetBird or Tailscale. These create an encrypted network between your devices without requiring you to open any ports on your router. Your server gets a private IP address that only your authorized devices can reach.
This is vastly safer than port forwarding or setting up a public reverse proxy, which you should not do yet. Private remote access gives you the convenience of reaching your services from anywhere while keeping them invisible to the rest of the internet.
Add your second service. Uptime Kuma pairs well here because now you have something to monitor. Set it up to watch your first service and (optionally) alert you if it goes down.
Establish your maintenance routine:
- Monthly update check for your services and host OS
- Monthly “restore spot-check” (pick one backup, verify it works)
- Update your changelog whenever you change something
The goal for week four: Remote convenience without turning your home server into a public target. Two services running. A maintenance rhythm that feels sustainable.
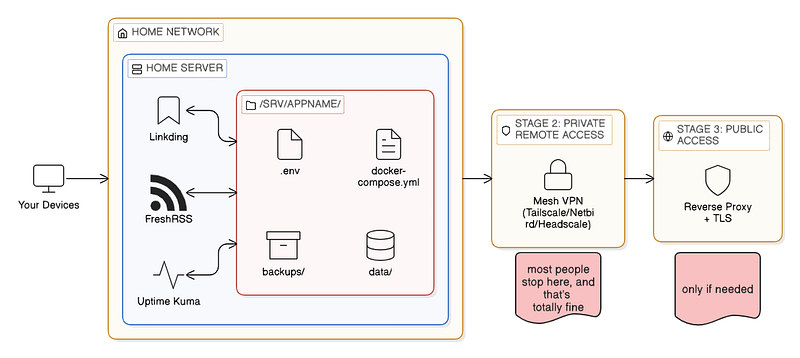
The roadmap: Local → private → public (only when needed)
I’ve hinted at this throughout, but let me make it explicit. There’s a progression to how you should think about access:
Stage 1: Local only. Services are accessible only from your home network. This is where you start and where you should stay until you’re comfortable with backups, updates, and the general operation of each service.
Stage 2: Private remote access. You add a mesh VPN or overlay network. Now you can reach your services from anywhere, but they’re still invisible to the public internet. Most people can stay at this stage forever and be perfectly happy.
Stage 3: Public access. You set up a reverse proxy with proper TLS certificates and expose specific services to the internet. This is necessary for some use cases (sharing a service with family who won’t install Tailscale, or running something that genuinely needs to be public), but it comes with real security responsibilities.
The mistake I see constantly is people jumping straight to stage 3 because they saw a tutorial that made it look easy. Then they have a misconfigured Nginx reverse proxy with an exposed admin panel, and they wonder why their server is suddenly mining cryptocurrency for someone in Eastern Europe.
Earn each stage. Most home services never need to be public at all.
What to avoid early
Let me consolidate the warnings I’ve scattered throughout into one place:
Exposing ports before you’re ready. No port forwarding, no public IPs, no “I’ll just open 443 real quick” until you understand what you’re exposing and how to secure it.
Running too many services at once. Each new service is more complexity, more updates, more potential failure points. Grow slowly.
Copying random compose files from the internet. Understand what you’re running. Read the compose file. Know what each environment variable does. Random configs from GitHub gists are how you end up with insecure defaults or mystery containers doing who-knows-what.
Skipping backup testing. I’ve said it three times now. I’ll say it again. Test your restores.
Chasing the perfect architecture. You do not need Kubernetes. You do not need a complex CI/CD pipeline. You do not need to choose between Docker and Podman right now (Docker is fine; Podman is also fine; the difference doesn’t matter at this stage). You don’t need Proxmox and nested virtualization and a VLAN for each service category. Start boring. Optimize later, if ever.
Putting critical data on untested infrastructure. Don’t migrate your entire photo library to a self-hosted solution until you’ve run that solution for a few months and verified your backup and restore process multiple times. Start with data you can afford to lose.
A simple folder structure
When you’re starting out, having a consistent layout for your services reduces cognitive load. Here’s a structure that works well:
/srv/
├── linkding/
│   ├── docker-compose.yml
│   ├── .env
│   ├── data/
│   └── backups/
├── freshrss/
│   ├── docker-compose.yml
│   ├── .env
│   ├── data/
│   └── backups/
└── uptime-kuma/
    ├── docker-compose.yml
    ├── .env
    ├── data/
    └── backups/
Each service gets its own directory. Inside that directory: the compose file, an environment file for secrets and configuration, a data directory (or this might be a Docker named volume, depending on the service), and a place for backups.
This makes it easy to find things, easy to back up (just tar the whole service directory), and easy to understand what you’re running at a glance.
A starter compose template
Here’s a minimal compose file template with comments explaining each part:
services:
  linkding:
    # The image to run - check the project's documentation for the current tag
    image: sissbruecker/linkding:latest

    # Name for the container (optional but helpful for logs/management)
    container_name: linkding

    # Map a port: HOST:CONTAINER
    # This makes the service available at http://your-server-ip:9090
    ports:
      - "9090:9090"

    # Mount data directories: HOST_PATH:CONTAINER_PATH
    # This is where your actual data persists
    volumes:
      - ./data:/etc/linkding/data

    # Load environment variables from .env file
    env_file:
      - .env

    # Restart policy - "unless-stopped" means it auto-starts after reboots
    # unless you explicitly stopped it
    restart: unless-stopped
And a corresponding .env file:
# Linkding configuration
# Generate a real secret key for production use
LD_SUPERUSER_NAME=admin
LD_SUPERUSER_PASSWORD=change_this_to_something_secure
This is intentionally minimal. Different services will have different configuration options. The pattern stays the same: image, ports, volumes, environment, restart policy.
Verification commands you’ll use constantly
Once you’ve got services running, these are the commands you’ll reach for most often:
# Is my container running?
docker ps

# What's in the logs?
docker logs linkding
docker logs linkding --tail 50 --follow

# Where are my volumes?
docker volume ls
docker volume inspect linkding_data

# How much disk space am I using?
df -h

# What's using the most space in this directory?
du -sh */ | sort -h

# Is my compose file valid?
docker compose config

# Restart a service after config changes
docker compose down && docker compose up -d
Write these down somewhere until they become muscle memory.
Definition of Done checklist
Use this checklist before you consider a service “done” and before you add another one. If you can’t tick everything, you’re not ready to expand.
If everything is checked, congratulations. You’re running a service properly, not just running a container. Add the next one whenever you’re ready.
Current trends worth knowing (January 2026)
The self-hosting landscape keeps evolving. A few things worth being aware of as you start your journey:
Mesh VPNs have become the default for remote access. Tailscale and its open-source alternatives (Headscale, NetBird) have essentially solved the “how do I access my stuff remotely?” problem for home users. The old approach of port forwarding and dynamic DNS is increasingly seen as unnecessary risk for most use cases.
Immich has matured significantly for photo management. If a Google Photos replacement is on your radar, it’s worth watching, but I’d still recommend getting comfortable with simpler services first.
Hardware-wise, mini-PCs continue to get cheaper and more capable. You can pick up a used or refurbished unit with plenty of power for home services for well under $200. The Raspberry Pi is still popular but less dominant than it was a few years ago, partly due to past availability issues and partly because x86 mini-PCs offer better compatibility with less fiddling.
Container management UIs like Komodo, Dockge and Portainer have gotten more beginner-friendly. These can be helpful for visualizing what’s running, but I’d still recommend learning the command line basics first. The UI is a convenience layer, not a replacement for understanding what’s happening underneath.
The “homelab” community continues to grow. Subreddits like r/selfhosted and r/homelab are more active than ever, and there’s a wealth of experience to tap into when you run into problems. Just remember that the people posting their elaborate 47-container setups are not representative of what you need to start.
Next steps after your first month
Once you’ve completed the first-month path and you’re comfortable with your initial services, here’s what comes next:
Add services gradually. One at a time, following the same process: deploy, learn the lifecycle, set up backups, test restore, document.
Consider private remote access if you haven’t already. NetBird takes about fifteen minutes to set up and dramatically expands when and where you can use your services.
Start thinking about storage if you’re planning to self-host anything with significant data (photos, media, files). This means understanding RAID (or choosing to use cloud backup instead), monitoring disk health, and planning for what happens when a drive fails.
Public access only when truly necessary. If you reach a point where you genuinely need a service accessible from the public internet (sharing with family, hosting a public website, etc.), then it’s time to learn about reverse proxies, TLS certificates (Let’s Encrypt makes this free), and proper security hardening. But that’s a topic for another article, and most home setups never actually need it.
Closing Thoughts
Self-hosting isn’t about replacing every cloud service in your life with something you run yourself. It’s about thoughtfully choosing which services benefit from you having control, and then running those services well.
The key word is “well.” Anyone can copy a docker-compose file from the internet and type up -d. Running a service properly means understanding what you're running, knowing where your data is, being able to recover when things break, and keeping everything updated and secure.
Start small. One service, one machine, local access only. Get comfortable with the fundamentals before you chase the elaborate setups you see people posting online. Those setups didn’t happen overnight, and the people running them built their skills the same way you’re about to: one service at a time, making mistakes, learning from them, and gradually expanding.
The rabbit hole is deep, and that’s part of the fun. But you don’t have to explore it all at once.
If you found this guide helpful, the best thing you can do is actually follow it. Pick a service from the starter list, set aside a few hours this weekend, and get something running. Then come back and tell me how it went. I’d genuinely love to hear about your first deployment, what confused you, what clicked, and what you’re planning to host next.
Happy hosting.
And now, to make things even easier for you at the start…
Quick reference
The self-hosting map
Backup script skeleton
Here’s a minimal but functional backup script to get you started. Save it as backup.sh in your home directory or in a scripts folder:
#!/bin/bash

# === CONFIGURATION ===
# Adjust these paths to match your setup
BACKUP_ROOT="/path/to/your/backups"
SERVICES_ROOT="/srv"
RETENTION_DAYS=30

# === SCRIPT START ===
DATE=$(date +%Y%m%d_%H%M%S)
BACKUP_DIR="$BACKUP_ROOT/$DATE"

echo "Starting backup at $DATE"
mkdir -p "$BACKUP_DIR"

# Backup each service directory
for service_dir in "$SERVICES_ROOT"/*/; do
    service_name=$(basename "$service_dir")
    echo "Backing up $service_name..."

    tar -czvf "$BACKUP_DIR/${service_name}.tar.gz" \
        -C "$SERVICES_ROOT" "$service_name"

    if [ $? -eq 0 ]; then
        echo "  ✓ $service_name backed up successfully"
    else
        echo "  ✗ ERROR backing up $service_name"
    fi
done

# Clean up old backups
echo "Cleaning up backups older than $RETENTION_DAYS days..."
find "$BACKUP_ROOT" -maxdepth 1 -type d -mtime +$RETENTION_DAYS -exec rm -rf {} \;

echo "Backup complete. Files saved to: $BACKUP_DIR"
echo "Current backup size: $(du -sh "$BACKUP_DIR" | cut -f1)"
Adjust paths to your setup, make it executable with chmod +x backup.sh and run it manually until you're comfortable, then add it to cron for automation:
# Edit crontab
crontab -e

# Add a line to run backups daily at 3am
0 3 * * * /home/yourusername/scripts/backup.sh >> /home/yourusername/logs/backup.log 2>&1
Restore checklist
When you need to restore (or when you’re testing your restore process, which you should do regularly), follow these steps:
- Create a temporary directory for the restore test
mkdir -p /tmp/restore-test
cd /tmp/restore-test
2. Extract your backup
tar -xzvf /path/to/backups/20260115_030000/linkding.tar.gz3. Verify the files are present
ls -la linkding/
# You should see: docker-compose.yml, .env, data/, etc.
4. Spin up a test instance (on a different port to avoid conflicts)
cd linkding
# Edit docker-compose.yml temporarily to use a different port (e.g., 9091)
docker compose up -d
5. Verify the service works
- Open the test instance in your browser
- Log in with your credentials
- Check that your data is present (bookmarks, feeds, notes, whatever the service stores)
6. Clean up the test
docker compose down
cd /tmp
rm -rf restore-test
If steps 4 and 5 succeeded, your backup is valid. If they failed, you’ve just learned something important before you actually needed that backup in an emergency.
Final checklist: Are you ready for service #2?
Print this out, stick it on your wall, or save it somewhere you’ll actually see it. Don’t add a second service until you can honestly check every box.
That’s everything. You now have everything you need to start self-hosting the right way: a clear understanding of what you’re getting into, a sensible progression from local to private to (maybe eventually) public, a first-month learning path that builds skills in the right order, and concrete checklists to keep you from skipping the boring-but-essential parts.
The community is out there when you need it. The r/selfhosted subreddit is genuinely helpful for beginners. Documentation for most popular self-hosted apps has gotten much better over the past few years. If you need help, drop a comment here or find me on Mastodon, I’ll be happy to help. And once you’ve got your first service running, you’ll find that the second one is easier, and the third one easier still.
Start this weekend. Pick one service. Follow the path. And welcome to the hobby.